Keep Your Marine Grade Canvas Cover Looking Its Best

Your Canvasman cover is built using high-performance marine-grade materials designed to protect your assets season after season. With the right care, your cover will continue to look great, perform brilliantly, and last for years to come.
This step-by-step guide shows you exactly how to clean, protect, and maintain your Marine Grade Canvas cover like a professional.
Before You Start
For the best results, choose a dry day so you can complete the entire process in one go.
Important:
Never use a pressure washer on your cover. High-pressure cleaning can damage the marine-grade fabric, stitching, and waterproof coatings.
For best results, we recommend using products from our Cleaning & Waterproofing range, specially selected for Marine Grade Canvas care.
Part 1: Clean Your Canvas Cover
A thorough clean prepares your cover for long-term protection and ensures any reproofing treatment performs properly.
Step 1: Remove and Prepare
Remove your cover and place it somewhere water can drain away safely without entering waterways.
To protect clear windows from scratches, lay the cover on a plastic sheet, tarp, or other clean soft surface.
Step 2: Remove Loose Dirt
Using a soft brush, gently remove any loose dirt, leaves, salt, or debris from the fabric.
Step 3: Wet the Fabric
Using a hose with a sprinkler attachment or a watering can, thoroughly soak the canvas.
Top tip: Keep water temperature below 30°C to protect the fabric and do not use a pressure washer
Step 4: Apply Canvas Cleaner
Using a specialist canvas cleaning product and a soft-bristle brush:
- Work in gentle circular motions
- Clean all panels thoroughly
- Don’t forget flaps, collars, and webbing straps
Avoid scrubbing the windows at this stage—they’ll be cleaned separately.
Leave the cleaning solution to soak for around 15 minutes.
Step 5: Treat Stubborn Areas
If marks remain:
- Reapply cleaning solution
- Brush more firmly where needed
- Allow another 15 minutes for the cleaner to work
Don’t be afraid to use additional cleaning solution on heavily soiled areas.
Step 6: Rinse Thoroughly
Rinse the entire cover until the water runs completely clear.
Why this matters:
Any stains left behind may become permanently sealed into the fabric during reproofing.
Step 7: Air Dry Naturally
Allow your cover to dry completely before moving on to waterproofing.
Dealing with Mould & Algae
Mould and algae can be difficult to remove with general cleaning alone and may leave staining behind.
For best results, we recommend using Iosso Mould & Mildew Stain Remover, specially formulated to remove staining, kill mould growth, and protect your marine fabric.
Part 2: Restore Your Clear Windows
Clear, polished windows not only look better—they improve visibility and help your cover feel like new again.
Step 1: Clean the Surface
Using a clean, soft cloth and a small amount of canvas cleaner:
- Gently remove dirt, grease, and salt deposits
- Rinse thoroughly
- Allow to dry completely
Step 2: Apply Window Polish
Using a specialist plastic window polish:
- Shake the bottle well
- Apply small amounts at a time
- Work in gentle circular motions using a clean, dry soft cloth
Take care not to get polish on the canvas fabric.
Step 3: Buff to a Shine
Once the polish has dried:
- Use another clean, dry cloth
- Buff thoroughly until the window is clear and glossy
Part 3: Reproof for Long-Term Protection
Once your cover is clean and fully dry, it’s ready to be reproofed.
Important:
Marine Grade Canvas should always be cleaned before reproofing.
Step 1: Work Panel by Panel
Lay the cover flat and treat one section at a time.
This time, you only need to treat the outside surface.
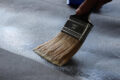
Step 2: Apply Reproofing Treatment
Using a wide paintbrush:
- Apply generously from the centre of each panel
- Work outward toward the seams
- Keep a wet edge as you work
This helps prevent visible tide marks and ensures an even finish.
Expert Care Tips
DO Choose the Right Day
A dry weather window allows you to complete cleaning and reproofing in one session.
Stopping halfway can leave unwanted tide marks.
DO Use Specialist Products
Household products such as washing-up liquid, shampoo, or general cleaners may damage the fabric and reduce waterproof performance.
DO Ventilate Your Cover Regularly
Especially after:
- Cooking inside
- Laundry
- Extended periods of closed storage
Good ventilation helps prevent:
- Condensation
- Mould growth
- Mildew staining
DON’T Scrub Too Aggressively
Stubborn stains may need extra attention, but excessive scrubbing can damage:
- Fabric fibres
- Stitching
- Waterproof coatings
DON’T Leave Covers Poorly Tensioned
Loose covers allow rainwater to pool, placing unnecessary strain on the canvas which may cause the fabric to be permanently stretched out of shape
DON’T Rush Reproofing
Some stains only become visible once the fabric is fully dry—always inspect before waterproofing.
Pro Tip: Keep Beeswax in Your Maintenance Kit
Beeswax is one of the most useful additions to your cover care routine.
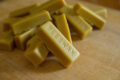
Use it to:
- Waterproof seams and stitching lines
- Lubricate zips for smoother operation
- Make press studs and fittings easier to use
Our recommendation:
Allow your cover to be naturally soaked by rain at least six times before applying beeswax to stitched seams.
This gives the stitching thread time to swell naturally, helping seal the tiny needle holes and reduce occasional drips.
Share this post


